> ## Documentation Index
> Fetch the complete documentation index at: https://docs.techfootintl.com/llms.txt
> Use this file to discover all available pages before exploring further.
# Account Hierarchy
> Learn how to configure account hierarchies and associate them with customers in Billspree.
An **Account Hierarchy** allows you to structure customer organizations hierarchically (for example, parent corporate entities, regional divisions, local franchises, and individual stores). This ensures that subscriptions, billing, and reporting are organized correctly across complex business structures.
***
## Configure account hierarchies
You define and manage account hierarchies in the user profile settings.
### 1. Access the configuration tab
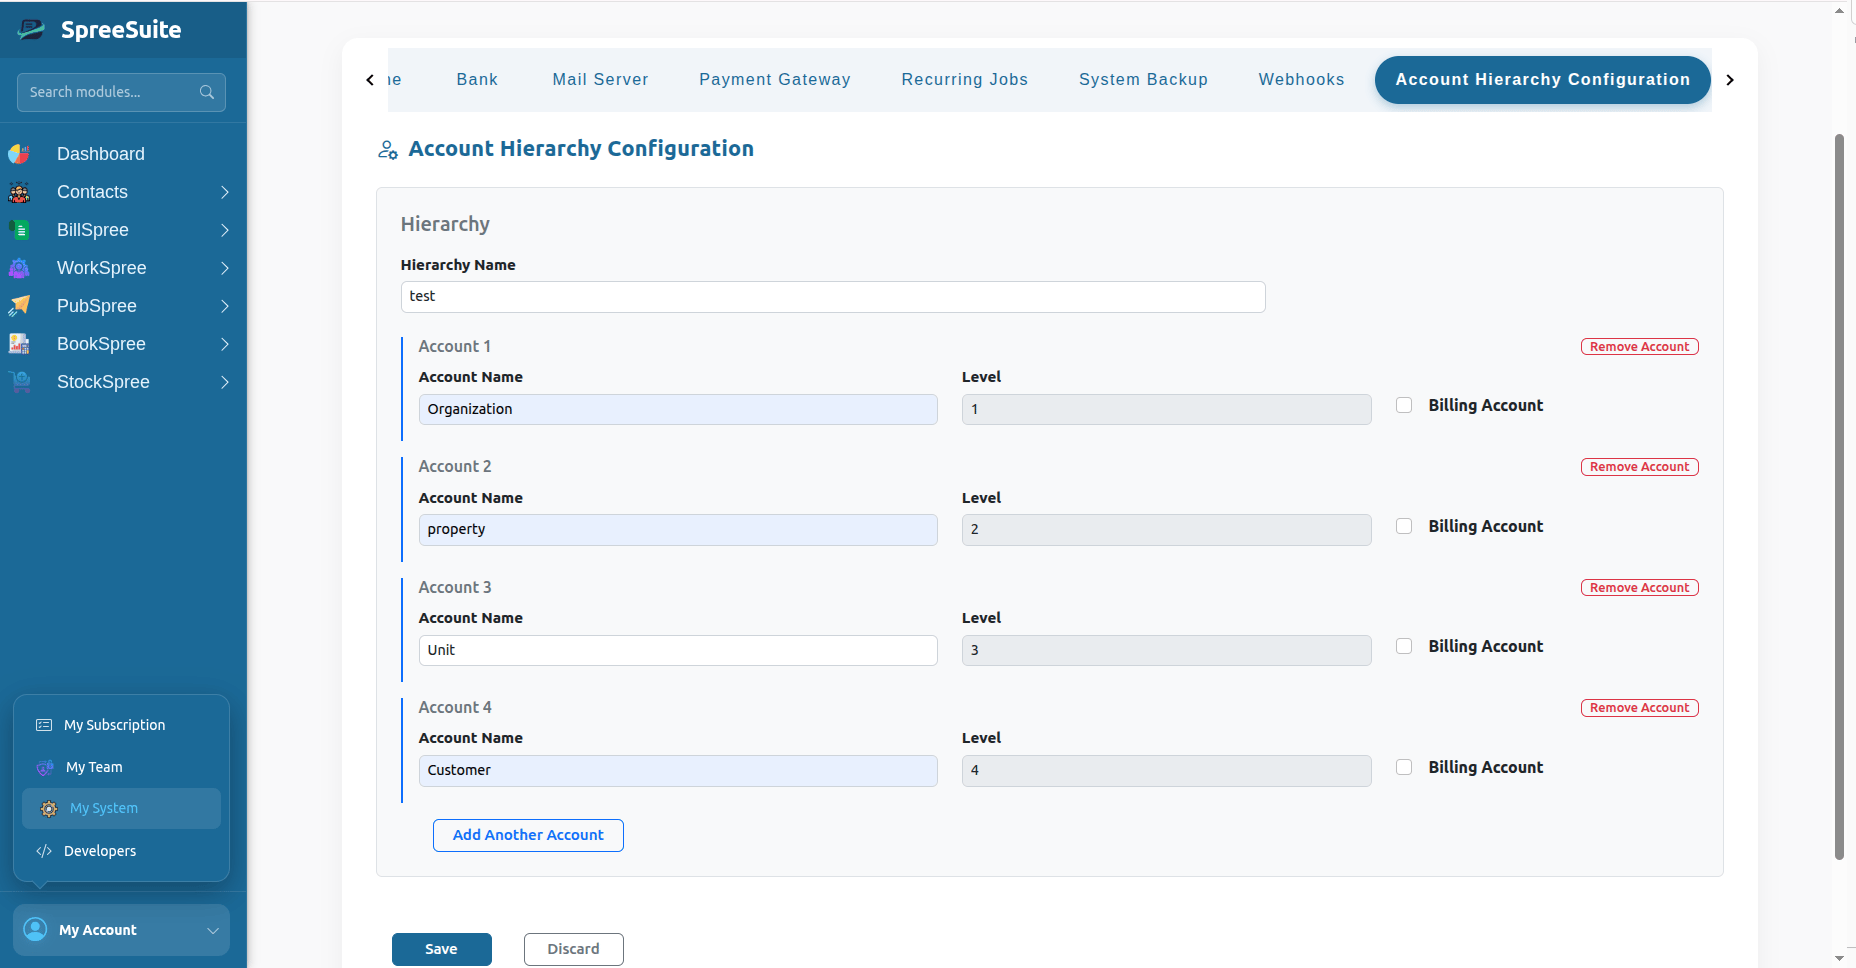
Navigate to your profile settings and click the **Account Hierarchy Configuration** tab.
### 2. Create a new hierarchy
To set up a hierarchy, follow these steps:
Enter a unique name for the structure in **Hierarchy Name**.
Add levels to represent each tier in the organization by clicking **Add Another Account**. For each level, specify the following details:
* **Account Name**: The label for the level (for example, `Region` or `Franchise`). The name must be unique within the hierarchy.
* **Level**: A positive integer representing the level depth (with `1` being the top/root level). Level numbers must be unique within the hierarchy.
* **Billing Account**: Select this checkbox if customers assigned to this level can hold billing subscriptions and be invoiced.
Click **Save** to create the hierarchy.
 Once you save a hierarchy, you cannot delete it, add/remove levels, or change level numbers. You can only update the names of the existing levels.
***
## Associate hierarchies with customers
You connect hierarchies to customers when registering a new customer or updating customer details.
### 1. Select the account hierarchy
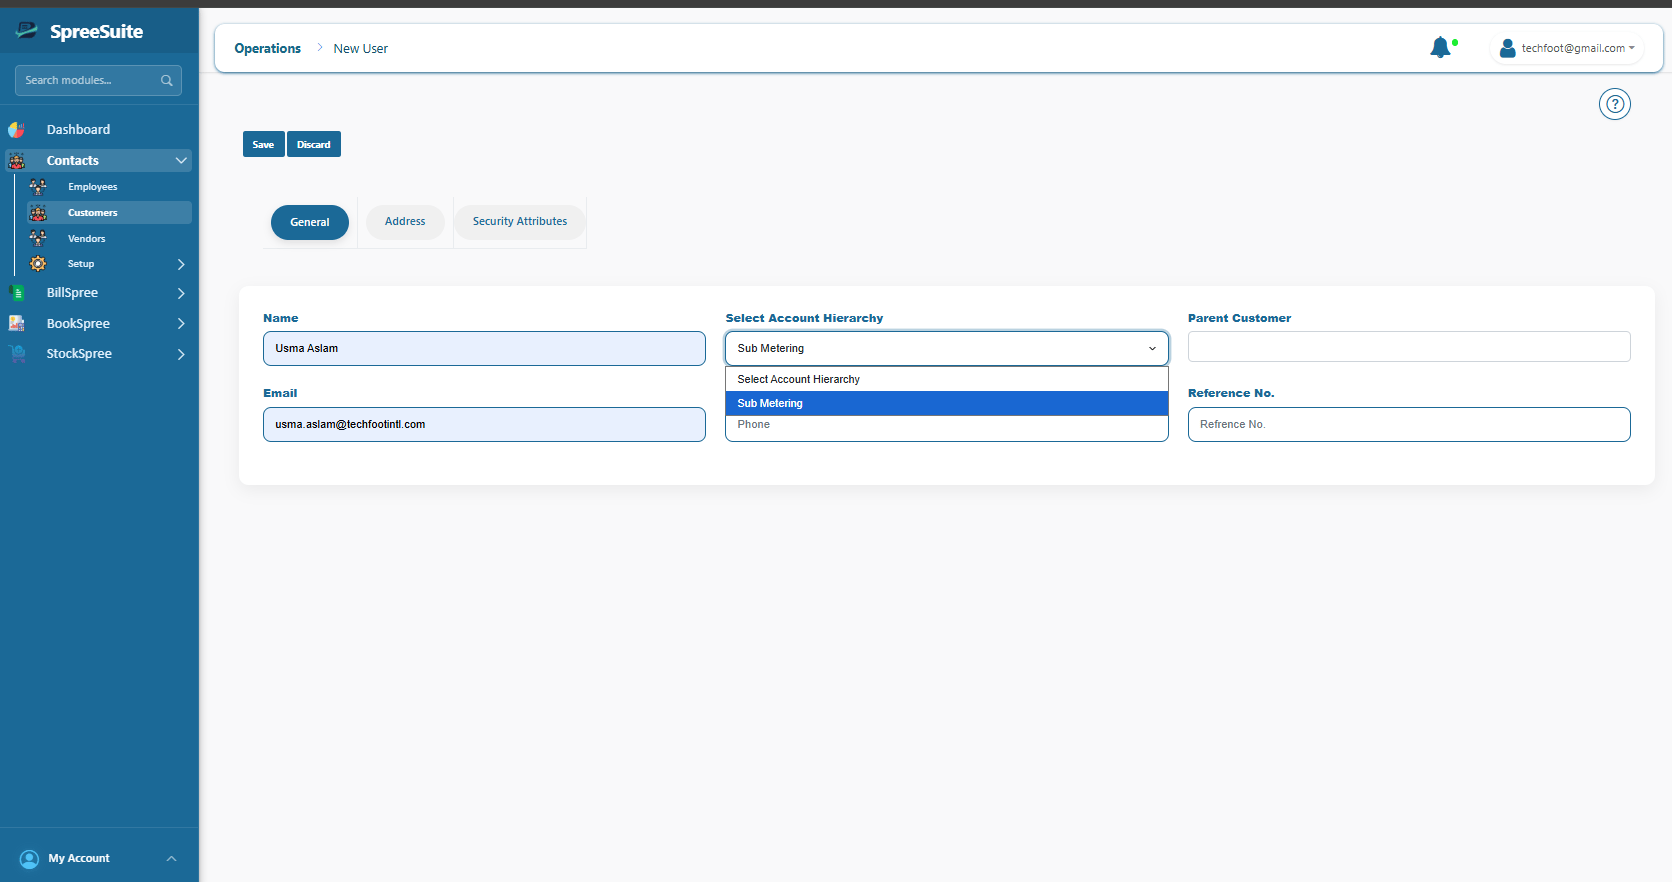
In the customer form, choose a configured hierarchy from the **Select Account Hierarchy** dropdown list.
Once you save a hierarchy, you cannot delete it, add/remove levels, or change level numbers. You can only update the names of the existing levels.
***
## Associate hierarchies with customers
You connect hierarchies to customers when registering a new customer or updating customer details.
### 1. Select the account hierarchy
In the customer form, choose a configured hierarchy from the **Select Account Hierarchy** dropdown list.
 ### 2. Determine the parent customer
You can set a parent-child relationship between customers using the **Parent Customer** field:
* **Root Customer (No Parent)**: If you select **No parent (root customer)**, the customer is assigned to the lowest level number defined in the hierarchy (Level 1).
* **Child Customer**: If you select an existing customer as the parent:
* The parent customer must belong to the same hierarchy.
* The new customer's level is automatically set to **Parent's Level + 1**.
* The system automatically inherits the hierarchy configuration of the parent customer if you do not select a hierarchy explicitly.
If a parent customer is already at the highest level configured for the selected hierarchy, the system prevents you from adding children under that parent.
### 3. Automatic billing assignment
The customer's **Billing Account** status is determined by the **Billing Account** checkbox configured for their assigned level.
* If the hierarchy configuration for their level has **Billing Account** checked, the customer is allowed to hold subscriptions.
* If it is unchecked, the customer is treated as a non-billing node in the hierarchy.
***
## Filter customers by hierarchy
You can easily locate customers within complex organizational structures by filtering your customer list based on their hierarchy assignment or level depth.
### Filter by hierarchy
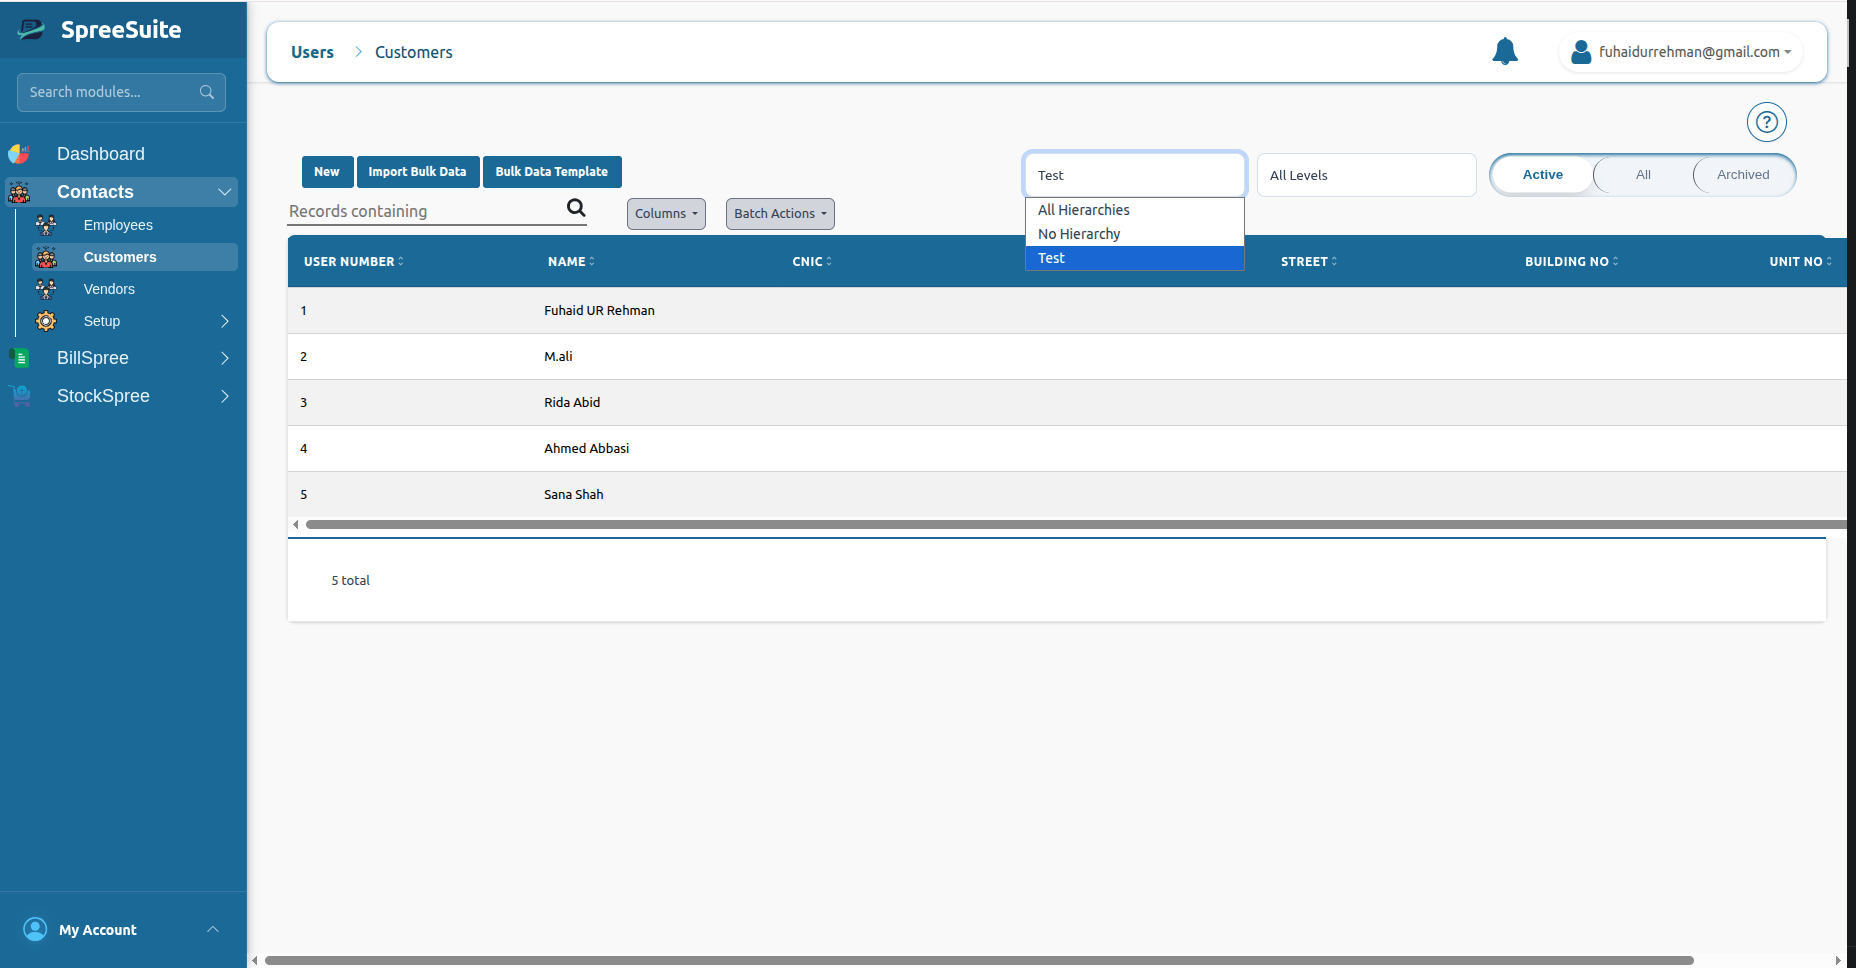
Use the hierarchy dropdown in the customer list to filter customers that belong to a specific hierarchy (for example, filtering by the "Test" hierarchy).
### 2. Determine the parent customer
You can set a parent-child relationship between customers using the **Parent Customer** field:
* **Root Customer (No Parent)**: If you select **No parent (root customer)**, the customer is assigned to the lowest level number defined in the hierarchy (Level 1).
* **Child Customer**: If you select an existing customer as the parent:
* The parent customer must belong to the same hierarchy.
* The new customer's level is automatically set to **Parent's Level + 1**.
* The system automatically inherits the hierarchy configuration of the parent customer if you do not select a hierarchy explicitly.
If a parent customer is already at the highest level configured for the selected hierarchy, the system prevents you from adding children under that parent.
### 3. Automatic billing assignment
The customer's **Billing Account** status is determined by the **Billing Account** checkbox configured for their assigned level.
* If the hierarchy configuration for their level has **Billing Account** checked, the customer is allowed to hold subscriptions.
* If it is unchecked, the customer is treated as a non-billing node in the hierarchy.
***
## Filter customers by hierarchy
You can easily locate customers within complex organizational structures by filtering your customer list based on their hierarchy assignment or level depth.
### Filter by hierarchy
Use the hierarchy dropdown in the customer list to filter customers that belong to a specific hierarchy (for example, filtering by the "Test" hierarchy).
 ### Filter by level
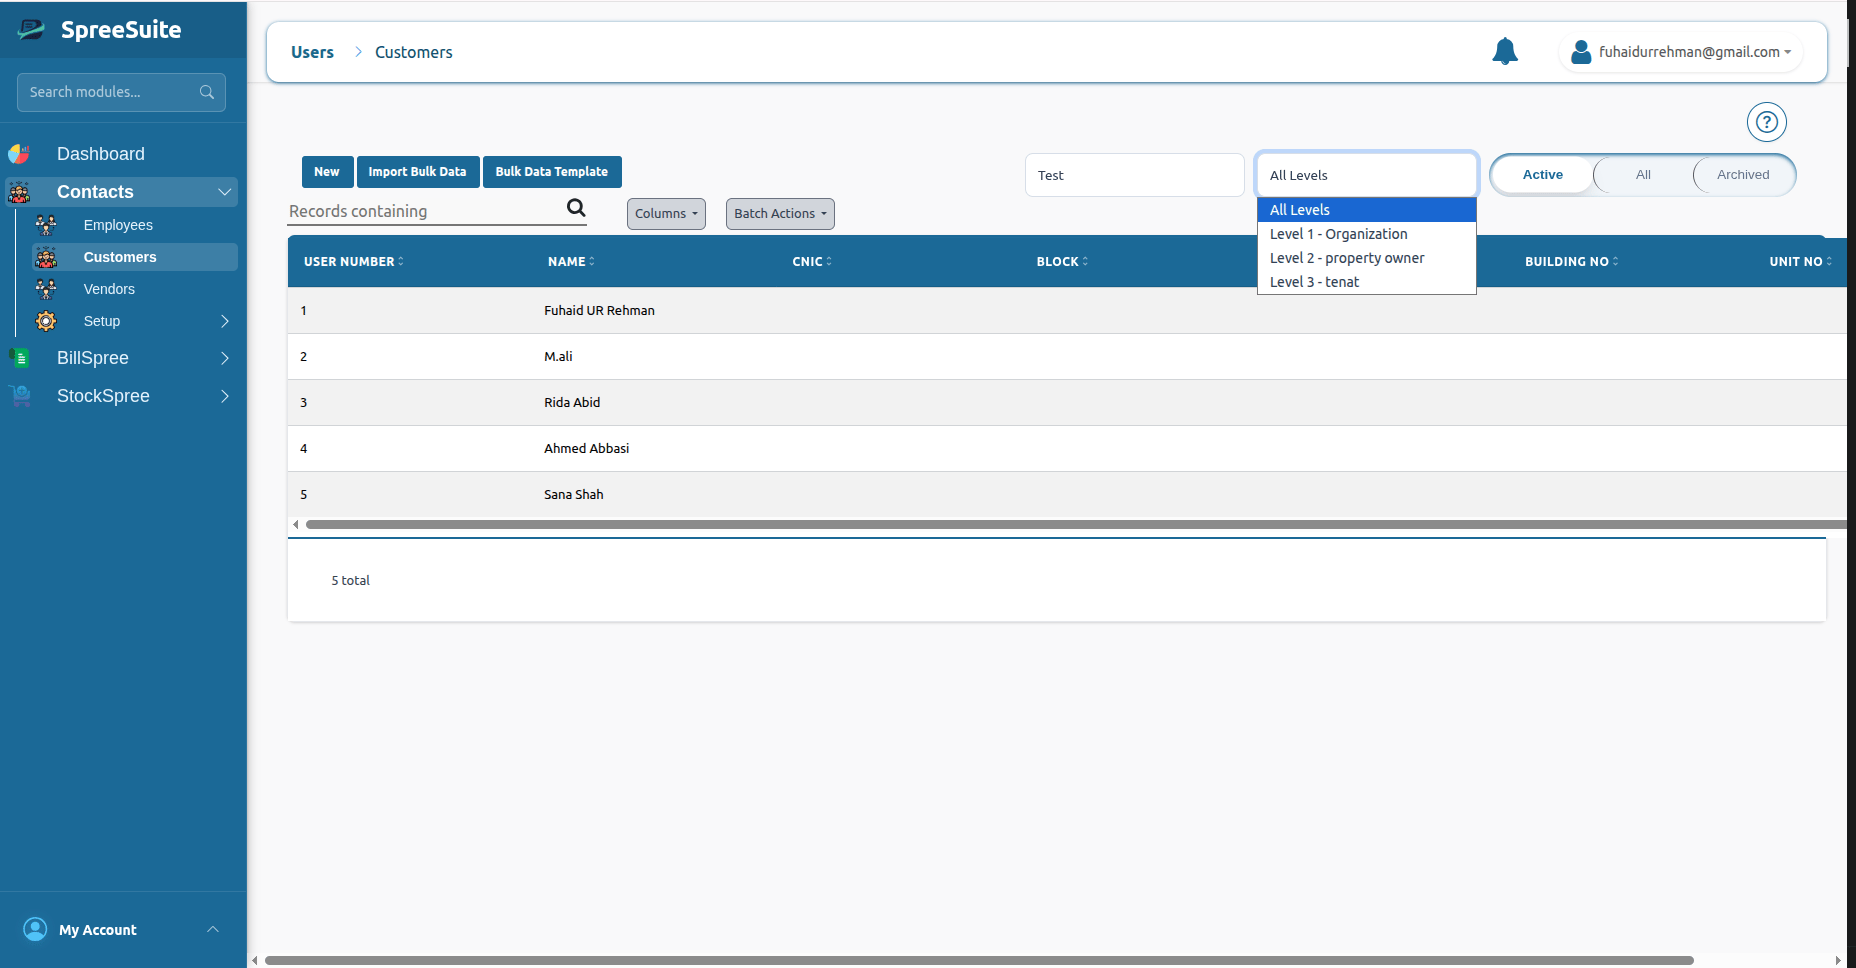
Once a hierarchy is selected, or when viewing all customers, use the level dropdown to filter customers by their specific depth within the organization structure (for example, "Level 1 - Organization" or "Level 2 - property owner").
### Filter by level
Once a hierarchy is selected, or when viewing all customers, use the level dropdown to filter customers by their specific depth within the organization structure (for example, "Level 1 - Organization" or "Level 2 - property owner").
 ***
## Next steps
* [Learn how to create customer profiles](/billing/customer-copied-1)
* [Manage billing accounts and subscriptions](/billing/billing-account)
***
## Next steps
* [Learn how to create customer profiles](/billing/customer-copied-1)
* [Manage billing accounts and subscriptions](/billing/billing-account)